Showing posts with label Raspberry PI. Show all posts

Wednesday, 22 May 2024

RPI: Setting up Raspberry Pi 3B+ to be accessible from anywhere

I have a simple trading bot that I currently run from a WSL Ubuntu session in my home computer. In this post, I'll set up a headless Raspberry Pi that can host that session. I still want to be able to control it from my mobile, so I need to do the following:

Set up RPI headless, Install and Disable screen saver

After installation, the board became unresponsive after some 10 minutes. I found

https://forums.raspberrypi.com/viewtopic.php?t=286000

Now, the RPI works fine for at least a couple of days.

Install app for accessing RPI from mobile

I found RaspController that is available for both Android and Iphone that gives a good interface to the RPI. 

Set up Dynamic DNS using NoIP

I activated a Dynamic DNS session using NoIP with both a host name and ipv4 IP.

As my router was too old, I decided to configure my RPI instead using the instructions below

https://www.noip.com/support/knowledgebase/install-linux-3-x-dynamic-update-client-duc

Make NoIP start automatically when booting

https://www.noip.com/support/knowledgebase/running-linux-duc-v3-0-startup-2

Configure Python and setup venv

There is plenty of documentation online

Nohup to run detached
Finally, since I need the program to run in the background, I used the nohup command to start the script,

https://www.digitalocean.com/community/tutorials/nohup-command-in-linux


Saturday, 17 April 2021

RPI: Demo of First Sprint and Sending SMS from 4G Router

In my summer house setup, I have a 4G/Wifi router. The data plan I have allows for some SMS messages to be sent. 

To be able to send SMS messages automatically, I copied a script that I found on a French blog. The code and repo is designed for Jeedom, but it worked on Raspberry PI, too. 

Demo of the First Sprint

With almost all targets met for this sprint, I am able to show a demo of what I've done in my pet project over the very limited spare time I have:

The 4G connection in the summer house is quite slow - 6 Mbit/s. Transmitting a picture of 4 MB will take some 7 seconds, and buffering the video stream will take some time too. When I tried with a better connection, it was a bit quicker.

The Code

I had to create a separate shell script for the stream and SMS setup


NAT Forwarding

The IP number that the 4G router gets is a NAT-ed IP number in the 24 bit block (starting with 10). This makes it hard to access the network from the external internet.

From forum discussions, it seems that I either need to buy a router from the current Internet Service Provider (ISP), or change ISP. Another option would be VPN, but I'll investigate that later in the future.

Next Step

I'll move the remaining task "RPI12: RPI server available from cellular" to the backlog. In the second sprint I'll explore face recognition for openCV. Depending on the output, I'll add more tasks to the sprint later.


Saturday, 20 March 2021

RPI: Upload a File to Cloud in Raspberry Pi CLI

I want to upload a photo to Google Drive or Dropbox using a Python script in a Raspberry PI.

A home surveillance use case might be:
  • A sensor detects that someone has entered the room (not implemented yet!)
  • A camera takes a photo of the living room
  • The picture is uploaded to the cloud before the burglar destroys the Raspberry PI.
Trying Google Drive
I enabled the Google Drive OAUTH using the public documentation and a guide from Iperius Backup. When running the python script, I got a error message that told me that I need to verify the app/script towards Google and that process seemed to be complicated, so I decided to try another approach.

Testing Dropbox

After giving up Google Drive, I found the Dropbox approach to be much more successful. It takes two steps to activate: Create a local script that connects to Dropbox, and define what the script is allowed to do. 

First, I define what the script is allowed to do:
Step 1: Configure the new app access credentials in Dropbox
  1. Log in to Dropbox Developers and go to the App Console and select Create App.
  2. There are three steps to take:
    1. Choose an API - Dropbox allows only scoped access (the creator of the app can select what authorities the app can have).
    2. Choose the Type of Access  You Need - I choose App Folder for security reasons. The Full Dropbox option would allow the app to access all files in my account and that would be risky.
    3. Name your app - this name must be unique in Dropbox. You can't use a name that any other Dropbox developer has used.
Step 2: Now when the app is created, I need to define the scope (privileges) of the app. This is done in Scoped App. 
Step 3: Select what the app shall be allowed to read and modify in my Dropbox account:
Step 4: Once that is configured, it is time to generate an access token. The default Access token expiration  is Short-lived (expires in four hours). I select No expiration. I click Generate and I copy the code that is shown.
The access token must be re-generated if any access token is changed.
The second part is to write the Python code. 
The script uploads the specified picture with the current time as file name.

That's it! When I run the script, the file is uploaded to my Dropbox account

Of course, I could have set up Dropbox the normal way (assigning a folder and sync it to Dropbox). In this case, I didn't want to save 2G of files on a SD card with limited disk space.

I found a video tutorial that illustrates how to do it:

In my project anatomy, there are only two steps left, before starting the next sprint of my IOT project. 


Saturday, 13 March 2021

IOT: Data from computer to Arduino

One of the tasks on my first IOT  project anatomy is to send data to the Arduino from Raspberry PI to my Arduino board. 

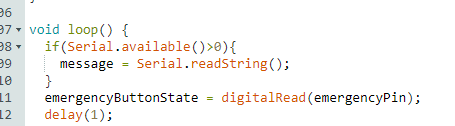
There is one Arduino feature one needs to consider when sending serial data to Arduino over USB port: Every the serial connection is established, the Arduino is reset. This is a feature that simplifies the process of loading software to the board. 

If a script establishes a serial connection to the Arduino, it takes one second for the board to boot. If the script sends serial data during that time, that data is lost. Further, if the connection is released and reestablished, the board reboots.

My solution to that issue is to wait for the board to boot and to keep the connection alive during the entire session.

The data must be encoded to binary format

The sender script specifies interface, baudrate and timeout and the receiving script sends the incoming string to the display for some seconds. 

And finally, the incoming message is shown on the Arduino LCD.

I'm getting close to completion of the first step of my IOT journey. The remaining tasks are to make the Raspberry Pi available from the external internet, send SMS from the router and to push pictures to the cloud from the Raspberry Pi whenever someone activates the emergency button.

After that, I'll plan the next steps for the IOT project.


Saturday, 30 January 2021

IOT: Data from Arduino to Raspberry PI

In this step, I'll send data from Arduino to Raspberry PI. 

When the user activates the emergency function, a signal will be sent to the RPI that will take a photo and publish on a web server. You can find more information about the traffic lights project here.

Step 1: Connecting Arduino to Raspberry PI

The RPI is connected to a camera module.
A USB cable connects power and serial from the RPI to the Arduino.


The first step is to find the serial port. For the RPI, I've compared the tty ports without and with the Arduino.

The interface /dev/ttyACM0 shows up when I connect the Arduino over USB.

I uploaded a small python script with code that I found on DiyIOt from my Windows computer to my Raspberry PI.

I added a couple of lines to take a photo on the webcam


Step 2: Take a picture, if the emergency button is pressed.
The script checks if the message matches the expected string. If it does, the script will ask the shell to take a photo and save it in /var/www/html/ folder.

When the RPI detects "Switch to Emergency", it captures a JPEG image.
In order to reduce the download time, I've selected a lower resolution than the 3280x2464 that is supported.

Step 3: Publish the image on the web server
The /var/www/html folder is owned by root. This makes it hard to save files there automatically. To resolve this, I've changed the ownership and permissions for that folder. 

A very simple web page that reloads every third second shows the picture. Code and screenshot below:

The updated webpage looks like this:

Now, an event on the Arduino can trigger the RPI to take a photo and show it on an internal web page. The next step will be to send some feedback from RPI to Arduino and to explore video streaming from RPI.


Saturday, 5 December 2020

IOT: Setting Up a Web Camera for a Headless Raspberry PI

In my IOT project, I need to take pictures with a headless Raspberry PI. 

The camera that I use today is an  USB 8$ web camera with a picture resolution of 640x480. It is a temporary solution - the official camera module v2 supports a resolution of 3280x2464 pixels and weighs only 3g.

In this project, I followed the documentation.

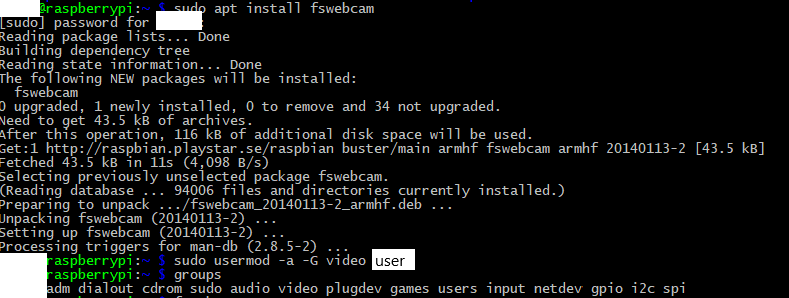
After connecting it to a USB port, I installed the fswebcam package:

Using the camera from command line is easy. If the resolution flag isn't specified, the RPI will use a lower resolution: 

The resulting picture has a time stamp in the lower part.

Sometimes, I need to get the pictures to my Windows 10 computer. Since I'm familiar with the scp command, I needed to install it in Microsoft PowerShell:

So far, it is quite straight forward to use Raspberry PI. The earlier models were launched eight years ago, so many of the early bugs and features has been solved over the last years. My board, Raspberry PI 3 B+ was launched three years ago.

The next step will be to setup a web server with a Wordpress web page on the Raspberry PI. I will use that for posting pictures from the web camera. Or maybe I'll just use a Python script for posting the picture on a dedicated blog.


Saturday, 28 November 2020

IOT: Bringing up Raspberry PI

For my IOT project, I'll have a Raspberry PI 3 (RPI) together with some Arduino units, where RPI will serve as a secure gateway to the Internet.

The first step is to bring up the RPI and configure it for a monitor with landscape orientation.

Step 1: Protecting the RPI

Even though some of the circuits are covered, I'm still working with open electronics, that can be damaged just by me touching it. To protect the circuits, I've build a simple box in Lego, where I can still reach the USB and HDMI ports. 

Step 2: Disconnecting the Mouse and Keyboard - Bringing up SSH

I want to use the RPI without keyboard, mouse and monitor. To still be able to control the RPI, I had to install and configure SSH using this instruction.

After a reboot, I discovered that the SSH client (Windows 10/WSL/Ubuntu) timed out when trying to connect to RPI. The SSH client in DOS (Windows 10) worked fine, but I need to understand what happened to the WSL SSH client. 

Step 3: Disconnecting the Monitor - Bringing up Virtual Desktop

It is easy to install the VNC server using apt-get.

Any client will do, I selected RealVNC Viewer.

The desktop is configured for portrait mode.

Step 4: Setting a Static IP address for the RPI

I'm following the guide from raspberrytips.com. The router's IP address is  192.168.X.Y (I won't disclose details regarding my network).

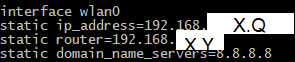
The desired IP address will be 192.168.X.Z and the MAC address is Q. Now, I know enough to set the RPI to have the same IP address. In the file /etc/dhcpcd.conf, I added the following lines:

My typo on the third row disabled internet access to the RPI.
It should be routers.

Finally, I made a reservation for my RPI in my DLink router to ensure that no other device will get the same IP number.
With these changes, the RPI will always get the same IP on this network.

Step 5: Firewall and Antivirus
I'm following the Raspberry PI guide for security.

There is a discussion in the Linux community whether antivirus or firewalls are needed for Linux. Those who say that it isn't needed mean that there are very few viruses targeting Linux. To me, it sounds like "famous last words".

For my system, I personally don't see a great threa.t - I don't save any personal data on my mini computer. I will install it anyways for curiosity. I installed clam antivirus and the iptables/ufw firewall.

I created a new user with root privileges. When trying to ssh to the RPI, I was rejected. I had to add the user to the AllowUsers tag in /etc/ssh/sshd_config file.

Another measure to increase security of the RPI would be to change the SSH port number (default port is 22). Then, an attacker would need to scan the different ports for a SSH connection. Changing port number can be done by editing /etc/ssh/sshd_config.

Conclusion:


Now, the RPI is up and running with an acceptable security. I have a grip on the basics on the Arduino and I've been able to setup a project with a LCD display, several LED's, a potentiometer and a push button. 

The next step will be to connect a 8$ web camera to the Raspberry PI and to set up a web server on that micro computer.

Saturday, 31 October 2020

IOT: A New Project

For the coming year, I will focus on IOT - Internet of Things. I have bought a starter kit for Arduino (a microcontroller with some basic electronic stuff like a motor, diodes, buttons, potentiometers and a LCD display). Together with a Raspberry PI computer that I got as a birthday gift, I have something to start exploring. 
My first project on my own - a simple traffic light.

I'll start with learning the basics - I follow the examples in "Arduino Projects Book" and I'll bring up a Raspberry PI to have basic security and connectivity (no mouse, keyboard or monitor connected).

The long term vision is a remotely controlled vehicle that has a web server and that can take pictures and stream video. Maybe I'll also add some sensors to log temperature. 

The initial project plan looks like this;
Green means done and yellow means "work in progress".
Green means done,
Yellow means "work in progress".
Blue means "not started".

The main obstacle from a fully mobile mini-vehicle is to charge the battery without connecting it manually. I'll look into that later on.