My blog has been silent for a couple of months. This often happens when I focus on other projects - and I think it should be that way.
Children: Spending time with a baby and a pre-school infant is sometimes challenging, always rewarding.
Work: In my new position (same company), I have more challenging and interesting tasks than before. I create reports, make changes in the test framework and work closer to the hardware. As I've had a steep learning curve at work, I've had a much slower pace for my pet projects.
Home: We have had a major renovation project in our house, including:
A new roof
Solar panels on the new roof (not yet connected to the power grid). More details on my other blog.
Wood floor for the attic
Replacing the side panels
Installing a skylight window
Installing a wood stove
The project took two months of time and I didn't have time to focus on pet projects.
As I've entered a long parental leave and we have no (major) projects in the house in a near future, I hope to have more time for pet projects.
The next step for my IOT project is to use facial recognition so that the Raspberry P can decide whether or not to alert the home owner.
I'll use OpenCV for this part. OpenCV is a very capable free package for computer vision and imaging.
OpenCV can be installed for Python and comes in four different options:
Main modules: opencv-python
Main modules with extra modules such as contributions from the opencv community: opencv-contrib-python
Headless mode (no GUI modules): opencv-python-headless
Headless mode with extra modules: opencv-contrib-python-headless
As I want to use it in a headless Raspberry Pi later, I'll go for the first option for development and the fourth option for deployment.
Detecting a face using openCv is a two step process:
1. Detect the faces in a picture
2. Identify a face from step 1. That will require a training set of some images of the person that shall be identified.
Face Detecton
OpenCV is using Haar Cascades to detect various objects such as faces, eyes, mouths and license plates for example. The models are available as xml files at the OpenCV Github repository and no machine learning training will be necessary for this step.
After downloading the file haarcascade_frontalcatface to a local folder, my script will apply the Haar cascade model to a webcam session:
The Haar cascade algorithm is quite sensitive to noise. In the image below, five faces were detected, but only one face was authentic.
In the right region, some false faces were detected.
It is possible to reduce the risk of false faces by tweaking some parameters, but then the risk of missing authentic faces increases. Below are some faces of Hollywood celebrities that weren't detected by the algorithm:
It seems that the algorithm fails detecting faces that are tilting too much. Shadows in the faces can also confuse the algorithm.
In the next blog post. I'll try to train an existing algorithm to identify faces.
In my summer house setup, I have a 4G/Wifi router. The data plan I have allows for some SMS messages to be sent.
To be able to send SMS messages automatically, I copied a script that I found on a French blog. The code and repo is designed for Jeedom, but it worked on Raspberry PI, too.
Demo of the First Sprint
With almost all targets met for this sprint, I am able to show a demo of what I've done in my pet project over the very limited spare time I have:
The 4G connection in the summer house is quite slow - 6 Mbit/s. Transmitting a picture of 4 MB will take some 7 seconds, and buffering the video stream will take some time too. When I tried with a better connection, it was a bit quicker.
The Code
I had to create a separate shell script for the stream and SMS setup
NAT Forwarding
The IP number that the 4G router gets is a NAT-ed IP number in the 24 bit block (starting with 10). This makes it hard to access the network from the external internet.
From forum discussions, it seems that I either need to buy a router from the current Internet Service Provider (ISP), or change ISP. Another option would be VPN, but I'll investigate that later in the future.
Next Step
I'll move the remaining task "RPI12: RPI server available from cellular" to the backlog. In the second sprint I'll explore face recognition for openCV. Depending on the output, I'll add more tasks to the sprint later.
Update: My current ISP has NAT restrictions that affects the ability to reach a server externally.
My family's summer house is now equipped with a 4G hotspot that provides Wi-Fi connectivity to the house. That will make it suitable for remote surveillance.
I will need to connect the Raspberry PI computer in that network, but since IP addresses on cellular networks aren't static, the network will be hard to reach. This blog post will explore how to reach a server behind a cellular network.
The task is divided into two sub tasks:
Reach a server behind a router (Port Forwarding)
Being able to access a cellular router whose IP will change once in a while
Step 1: Reach a Server Behind a Router
This is quite straight forward - I just used the port forwarding settings. When one sends a request to the router with a specific port number, the router translates that port number into an IP number inside the local network.
In order to make my Raspberry PI less vulnerable for malicious access, I have changed the SSH port to a secret port number.
On the router, I've enabled port forwarding for the new port number to my Raspberry PI. To verify, I opened a ssh connection from my laptop->Iphone->4G Network ->Internet-> Router-> Raspberry PI
As an extra layer of safety, I installed fail2ban, a software that protects servers from brute force attacks.
Step 2: Handle Dynamic IP Numbers
This will be handled using DDNS (Dynamic Domain Name System). A script on the Raspberry PI will regularly update the IP number to the DDNS server. Whenever a user tries to reach the DDNS, the server will provide the current IP number.
Step 2a: Change the SSH port on the Raspberry PI
This is a security measure that will be more necessary since my network will be easier to find.
Step 2b: Register to a DDNS Service
The easiest option would be to make the router itself connect to a dynamic DNS service. That must be done on site.
I want to upload a photo to Google Drive or Dropbox using a Python script in a Raspberry PI.
A home surveillance use case might be:
A sensor detects that someone has entered the room (not implemented yet!)
A camera takes a photo of the living room
The picture is uploaded to the cloud before the burglar destroys the Raspberry PI.
Trying Google Drive
I enabled the Google Drive OAUTH using the public documentation and a guide from Iperius Backup. When running the python script, I got a error message that told me that I need to verify the app/script towards Google and that process seemed to be complicated, so I decided to try another approach.
Testing Dropbox
After giving up Google Drive, I found the Dropbox approach to be much more successful. It takes two steps to activate: Create a local script that connects to Dropbox, and define what the script is allowed to do.
First, I define what the script is allowed to do:
Step 1: Configure the new app access credentials in Dropbox
Log in to Dropbox Developers and go to the App Console and select Create App.
There are three steps to take:
Choose an API - Dropbox allows only scoped access (the creator of the app can select what authorities the app can have).
Choose the Type of Access You Need - I choose App Folder for security reasons. The Full Dropbox option would allow the app to access all files in my account and that would be risky.
Name your app - this name must be unique in Dropbox. You can't use a name that any other Dropbox developer has used.
Step 2: Now when the app is created, I need to define the scope (privileges) of the app. This is done in Scoped App.
Step 3: Select what the app shall be allowed to read and modify in my Dropbox account:
Step 4: Once that is configured, it is time to generate an access token. The default Access token expiration is Short-lived (expires in four hours). I select No expiration. I click Generate and I copy the code that is shown.
The access token must be re-generated if any access token is changed.
The second part is to write the Python code.
The script uploads the specified picture with the current time as file name.
That's it! When I run the script, the file is uploaded to my Dropbox account
Of course, I could have set up Dropbox the normal way (assigning a folder and sync it to Dropbox). In this case, I didn't want to save 2G of files on a SD card with limited disk space.
I found a video tutorial that illustrates how to do it:
In my project anatomy, there are only two steps left, before starting the next sprint of my IOT project.
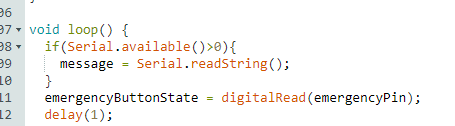
One of the tasks on my first IOT project anatomy is to send data to the Arduino from Raspberry PI to my Arduino board.
There is one Arduino feature one needs to consider when sending serial data to Arduino over USB port: Every the serial connection is established, the Arduino is reset. This is a feature that simplifies the process of loading software to the board.
If a script establishes a serial connection to the Arduino, it takes one second for the board to boot. If the script sends serial data during that time, that data is lost. Further, if the connection is released and reestablished, the board reboots.
My solution to that issue is to wait for the board to boot and to keep the connection alive during the entire session.
The data must be encoded to binary format
The sender script specifies interface, baudrate and timeout and the receiving script sends the incoming string to the display for some seconds.
And finally, the incoming message is shown on the Arduino LCD.
I'm getting close to completion of the first step of my IOT journey. The remaining tasks are to make the Raspberry Pi available from the external internet, send SMS from the router and to push pictures to the cloud from the Raspberry Pi whenever someone activates the emergency button.
After that, I'll plan the next steps for the IOT project.
This one was easier than I thought. I wanted to send/log data from my Raspberry Pi to Thingspeak.
Step 1 - Activate a Thingspeak Account and set up a channel
The channel has a number of fields. In this case, I use only one field, "field1".
Step 2 - Get an API key for Thingspeak
The API Write key is necessary for Thingspeak to know what channel to publish to.
Step 3 - Send data to Thingspeak using "POST" with the channel number and the data.
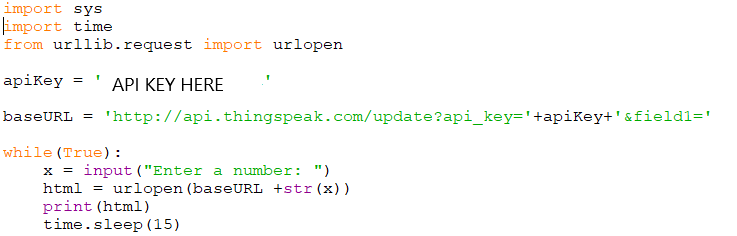
The free version of Thingspeak allows for one update every 15 seconds. My script simply takes a number from the console and posts it to Thingspeak with a 15 second interval.