Saturday, 13 March 2021

IOT: Data from computer to Arduino

One of the tasks on my first IOT  project anatomy is to send data to the Arduino from Raspberry PI to my Arduino board. 

There is one Arduino feature one needs to consider when sending serial data to Arduino over USB port: Every the serial connection is established, the Arduino is reset. This is a feature that simplifies the process of loading software to the board. 

If a script establishes a serial connection to the Arduino, it takes one second for the board to boot. If the script sends serial data during that time, that data is lost. Further, if the connection is released and reestablished, the board reboots.

My solution to that issue is to wait for the board to boot and to keep the connection alive during the entire session.

The data must be encoded to binary format

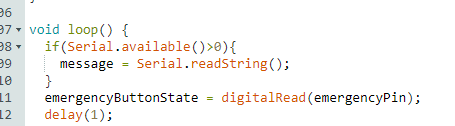
The sender script specifies interface, baudrate and timeout and the receiving script sends the incoming string to the display for some seconds. 

And finally, the incoming message is shown on the Arduino LCD.

I'm getting close to completion of the first step of my IOT journey. The remaining tasks are to make the Raspberry Pi available from the external internet, send SMS from the router and to push pictures to the cloud from the Raspberry Pi whenever someone activates the emergency button.

After that, I'll plan the next steps for the IOT project.


Saturday, 6 March 2021

IOT: Connecting Raspberry Pi to Thingspeak

This one was easier than I thought. I wanted to send/log data from my Raspberry Pi to Thingspeak. 

Step 1 - Activate a Thingspeak Account and set up a channel

The channel has a number of fields. In this case, I use only one field, "field1".

Step 2 - Get an API key for Thingspeak

The API Write key is necessary for Thingspeak to know what channel to publish to. 


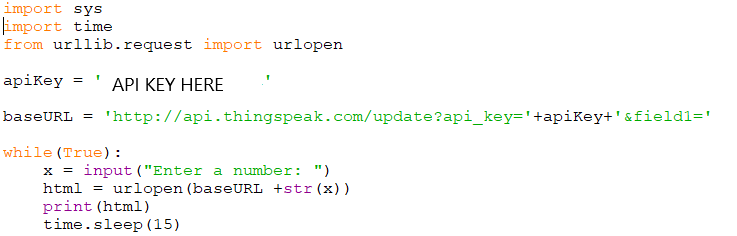
Step 3 - Send data to Thingspeak using "POST" with the channel number and the data.
The free version of Thingspeak allows for one update every 15 seconds. My script simply takes a number from the console and posts it to Thingspeak with a 15 second interval.


The result:

Saturday, 20 February 2021

RPI: Streaming Video from Internal Website

Previously, I was able to setup a web camera with an update interval of 5 seconds. Now, I want to stream video from the camera.

Option 1: Using a Script to Implement a Super Simple Web Server with Webcam:

I followed the tutorial and got a pretty good result. There is some lag in the video stream, but overall the experience is quite good.

The Python script implements:

  • a small web server, which can make it hard to embed into a larger web site. 
  • a stream using the camera that is fed to the web site.

In this case, the web server and stream are on port 8000. 

The drawback with this approach is that the web server is extremely simple and hard to integrate to other functionality. The other option is even simpler: Using YouTube to stream the video.

Option 2: Stream Video Over YouTube

Step 1 - Preparations

First, I need to activate live streaming online on Youtube: 

"Sänd live" translates to "Go live".


There is a 24 hour delay to activate the "Go Live" functionality. For the mobile app, it seems that the "Go Live" feature is only available to accounts with more than 1000 viewers. I plan to stream from RPI using an encoder, so I hope that it will work anyways.

I expect streaming from a RPI to generate quite some heat, so I have removed the Lego case for my RPI as a precaution. 

Step 2 - Setting Up Livestream and saving URL and key

Step 3 - Running ffmpg / raspivid command from RPI

I use this command:

raspivid -o - -t 0 -vf -hf -fps 30 -b 6000000 | ffmpeg -re -ar 44100 -ac 2 -acodec pcm_s16le -f s16le -ac 2 -i /dev/zero -f h264 -i - -vcodec copy -acodec aac -ab 128k -g 50 -strict experimental -f flv rtmp://a.rtmp.youtube.com/live2/<SESSION>

raspivid captures video from a Raspberry Pi Camera module. The different options are:

  • -o - means that the output will be sent to stdout. Actually, it will be piped to ffmpeg. 
  • -vf  and -hf  means that the stream will be vertically flipped.
  • -fps 30 means that the stream will capture 30 frames per second
  • -b 6000000 means that the bit rate will be 6Mbit per second. It is maybe too much for the built in wifi adapter, so I may have to reduce the bitrate. 

The output is piped to ffmpeg that is used to record, convert and stream video. 

  • -re means reading input at native frame rate.
  • -ar 44100 sets the audio sampling frequency. The Raspberry Pi Camera module doesn't support audio so I should be able to skip this one.
  • -ac 2 sets the number of audio channels to two. I should be able to skip this one too.
  • -acodec pcm_s16le sets the audio codec.  I should be able to skip this one too.
  •  -f s16le forces format, like signed, 16 bits and little endian. 
  •  -i /dev/zero specifies input filename. This input provides a continuous stream of null characters. I don't know why that is specified to be the input.
  • -f h264 forces the format to H.264, a video coding format used in mpeg-4 
  • -vcodec copy means that the raw codec data is copied as is.
  •  -acodec aac -specifies audio codec againg
  • -ab 128k -sets the audio bitrate.
  • -g 50 sets the "Group of Pictures" size to 50
  • -strict experimental - specifies that the program doesn't need to be super-strict to the standards
  • -f flv rtmp://a.rtmp.youtube.com/live2/<SESSION> forces the output to go to my Youtube stream

The streaming key must be copied to the RPI CLI command.

I had ffmpeg installed already, so I didn't need to recompile it. The first streaming attempt had the image flipped upside down. After removing the fv and hv flags, the stream was initiated properly. 

It took a short while before the stream appeared on my Youtube channel.

This makes it much easier to access streams from my RPI. As long as I have the link to the stream, I can access it. I'll also be able to embed the stream into a html page.


Saturday, 30 January 2021

IOT: Data from Arduino to Raspberry PI

In this step, I'll send data from Arduino to Raspberry PI. 

When the user activates the emergency function, a signal will be sent to the RPI that will take a photo and publish on a web server. You can find more information about the traffic lights project here.

Step 1: Connecting Arduino to Raspberry PI

The RPI is connected to a camera module.
A USB cable connects power and serial from the RPI to the Arduino.


The first step is to find the serial port. For the RPI, I've compared the tty ports without and with the Arduino.

The interface /dev/ttyACM0 shows up when I connect the Arduino over USB.

I uploaded a small python script with code that I found on DiyIOt from my Windows computer to my Raspberry PI.

I added a couple of lines to take a photo on the webcam


Step 2: Take a picture, if the emergency button is pressed.
The script checks if the message matches the expected string. If it does, the script will ask the shell to take a photo and save it in /var/www/html/ folder.

When the RPI detects "Switch to Emergency", it captures a JPEG image.
In order to reduce the download time, I've selected a lower resolution than the 3280x2464 that is supported.

Step 3: Publish the image on the web server
The /var/www/html folder is owned by root. This makes it hard to save files there automatically. To resolve this, I've changed the ownership and permissions for that folder. 

A very simple web page that reloads every third second shows the picture. Code and screenshot below:

The updated webpage looks like this:

Now, an event on the Arduino can trigger the RPI to take a photo and show it on an internal web page. The next step will be to send some feedback from RPI to Arduino and to explore video streaming from RPI.


Saturday, 23 January 2021

IOT: Bringing Up a LTE Based Wi-Fi

As a Christmas gift, I purchased a TP-Link Archer MR600 LTE/4G router to a close relative to use at his vacation home. 

The radio conditions there are a bit challenging, with a concrete house on the northern side of a ridge, 1.3 km from a base station. The metal reinforcement bars in the concrete act as interferers, cancelling out 4G signals.

The router supports several LTE bands, including the coverage bands (8 and 20) and the capacity bands (3 and 7). The former bands have lower frequencies, which gives bigger coverage but lower performance and are suitable for rural areas. The latter bands have higher frequencies which gives smaller coverage but higher performance and are suitable for urban areas.

I tested the modem in my house in Åkarp with satisfactory results (RSRP: -100 dBm for Band 3 and 7). In the summer house, the signal was barely detectable.

I found a discussion on TP Link's forum where another user had the same issue. The support told that there was a firmware version that supported band selection, and I installed that on the router. After that, I was able to register to band 8.

A 4G router that doesn't allow the user to select band is a quite lousy router. Fortunately, it was possible to overcome that with another firmware, but that shouldn't be necessary.

Saturday, 9 January 2021

IOT: Setting Up a Web Server

With a toddler and a newborn at home, my pet projects will progress at a slower pace. Expect one or two blog posts every months.

So far, I've brought up a Raspberry PI 3 B into headless mode with a camera. I've also bought a 4G modem to a summer house that a close relative has. This will provide Wi-Fi connectivity for later deployments of IOT projects.


The next step is to bring up a web server on the RPI that shows the last pictures from the web camera.


Saturday, 2 January 2021

2020 in Retrospect

2020 was a dramatic year for me and that had some impact on my pet projects. 

The first wave of the pandemic came when I and my family moved to our current home in Åkarp. Luckily, that didn't affect the relocation and the contractors we used for fixing things in the house.

We got our second son when the second wave was escalating in December. 

The pet projects still had some progress:

StockPredictor (C#, Python, SQL and Machine Learning): I created a Python script that connected to the SQL database and analyzed the data, for example identifying stock splits. I also made some improvements to the web scraper. After several months of work with the data, I was able to apply some machine learning algorithms to the data. As expected, the MLPRegressor wasn't able to predict future stock values - it seems that the market is quite efficient.

IOT (Arduino, Raspberry PI): I explored Arduino and followed some simple experiments to learn the basic concepts. After that, I created a simple set of traffic lights with an emergency button and a LCD display. For Raspberry PI, I brought up the system.

In 2021, I'll mainly focus on the house, work and family.  I still think I can have some progress on my pet project in IOT.