Saturday 23 February 2019

TravelTimeCalculator: Understanding the Settings Activity

In the last blog post, I added some default preferences to my app. Now, I'll try to change the code in order to understand how it works.

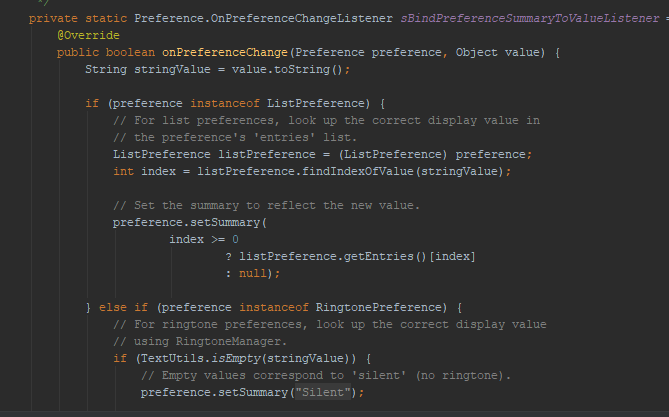
The first step is to add logs to see what values are parsed when a selection is made:

The log output above shows what happens when navigating the preferences. When selecting preferences, the corresponding strings that are defined in the preference files are found and printed to the console.

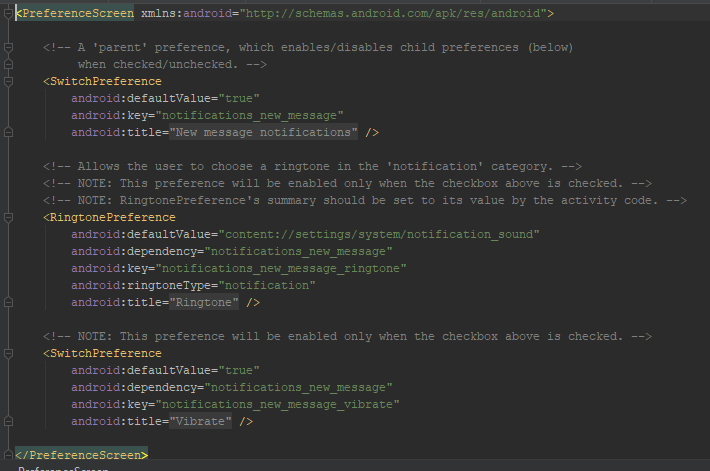
The strings are defined in the res/valuses/strings.xml file.
The settings themselves are defined in the settings xml files. Listeners are defined in the SettingsActivity.java file.
The pref_headers file encapsulates the sub screens for the different settings.
Here, the settings and some of their properties are set.
 Finally the source code with listeners are defined as listeners in the SettingsActivity.java file.

The second step is to modify the existing settings to two settings screens: One for general settings and one for settings related to the travel modes. I'll add suitable controls depending on what kind of input I need from the user.

  • General Settings:
    • Mode: Distance, Duration, Cost
    • Currency: A short text string, for example SEK or USD
    • Cost per Emission: SEK per kg CO2e
    • Time to cost ratio: SEK per hour
  • Travel Mode Settings:
    • Bicycling Start/Stop Time: seconds
    • Driving Start/Stop Time: seconds
    • Driving Cost per kilometer: SEK per km
    • Driving Emissions per kilometer: kg CO2e per km
    • Transit Ticket Cost: SEK
    • Transit Emissions per km; kg CO2e per km

I'll implement those settings in the next blog post.

Saturday 16 February 2019

TravelTimeCalculator: Adding a Preference Activity

My app can now query Google Directions for the best travel mode with respect to duration and present that on a map, when the user is tapping on it.

I want to let the user define what the best travel mode is, by selecting some parameters.

There will be three options for estimating the best travel mode:

  • Duration
  • Distance
  • Cost
Cost will consider the following parameters:
  • Travel duration and distance
  • Start and stop time (unlocking and locking the bike, finding a parking space for the car)
  • Travel costs per km (fuel cost and vehicle depreciation)
  • Travel costs per travel (transit ticket price)
  • Emissions (CO2e per km)
  • Time cost (SEK/s)
  • Environmental cost (SEK/CO2e
The app will calculate the cost for each travel mode:

For transit and driving, I'll use the estimates from klimatsmart semester (climate-smart vacation) to estimate the emissions per person-kilometer.

Adding a Settings Activity to the App
Users will need to change the settings above. I started by adding an activity to the project:

Specify the parent class

A couple of new files are created automatically, with the necessary code to make the new activity appear. Now, I need to understand the anatomy of the new files.

The preferences are defined in xml files in the java/res/xml folder
Currently, the code is autogenerated. The settings are divided into three submenus.
Preferences for ringtones are located in a submenu:

A listener is declared in the SettingsActivity class

The settings are designed in the XML file and accessed from the SettingsActivity class.

In the next blog post, I will explore the settings and its listeners further.

Saturday 9 February 2019

TravelTimeCalculator: Updating Markers When Moving Map

A couple of blog posts ago, I said that my final step was to add a custom image to the marker. I found some more things to do before I can consider the project to be finalized:
  • Estimating a cost that is related to the travels. That cost will consider ticket costs for public transit, fuel costs and time needed for finding parking slots for driving, environmental impact and time consumed. I'll elaborate more on that in a future blog post.
  • Refreshing the markers when the user is moving the map.
The first step is to clear the current markers from the map in the onCameraMove method.

After the old markers are cleared and removed from the map, I need to search the database for existing directions that origins or ends at the center of the map. I implemented getCoordinatePairsForPosition in dbHelper to get an arrayList of the found coordinates.

For all directions that are found, I query the database for the best direction. Using that information, I add a new marker.

Some screenshots from the app are shown below.
Step 1: User has added some markers with the shortest mode of
transport from the cross-hair center marker.
Step 2: When the user is moving the map,
the existing markers are removed.

Step 3: When the user moves to a position that has existing directions
in the database , markers are added to the map.
Next, I'll add a second activity where the user can select how the best mode will be selected: Shortest distance, shortest duration or the lowest total cost.

Side note: Issue seen for rounding: Sometimes, 13.0999 is rounded to 13.1 and sometimes 13.0. 
Root cause: Inconsistent rounding and truncation. Fix: Be consistent with how to round coordinates.


Saturday 2 February 2019

TravelTimeCalculator: Adding Multiple Markers for Directions

TravelTimeCalculator shall illustrate the best travel mode for different coordinates, related to the target of the map. I'll add the markers to an array of markers, either when the user taps the map or when the user moves the map to a new location.

Adding Markers After Tap

I store the markers in an array of markers.

Step 1: Adding markers dynamically when user taps on map
I added two lines of code to the onMapClicked method:

Step 2: Changing the added markers
CheckDirectionsFromDb will check if the direction has data for all transport modes. In that case, it will call updateMarker for that coordinate:
Since the method doesn't care whether the center of the map equals orig or dest,
I'll let the method updateMarker do that check,
To find the marker to change, the app searches all existing markers and compares with the tapped location:
First, the script determines which coordinate is connected to the marker.
After that, it changes the connected icon. Note the icons to the right.
The result is markers added to the map.

For some strange reason, the title is hidden when another marker is added.

The next blog post will discuss how the program shall add when moving the map. The markers should be cleared and existing directions shall be added, if found in the database.