Saturday, 1 October 2022

Qt: Upgrading from Qt 5.12.2 to Qt 6.3

After a couple of years exploring Machine Learning, IoT and Python, I'll return to TrafficControl. The current version of my project is Qt 5.12 - more than three years old. 

Upgrading from Qt 5.12 to Qt 6.3.2 seems to be easier said than done. It is recommended to start upgrading to Qt 5.15 and after that upgrading to Qt 6.3.2.

The steps for this project are:

Build and test the program as it is, with the installed version of Qt. 

There are sometimes changes to external services, such as map provider. I may also have done changes that I forgot about several years ago. 

Further, my antivirus program scans the binary that I compile, and that takes some time.

https://forum.qt.io/topic/90617/avast-alarm-to-qt-5-10-1-static-build/4

I solved the issue by adding an exception to the anti virus program. 

Push the current version of the program to GitHub. 

I saw that I had some staged changes that I had to check. After generating an access token, I was finally able to push the changes to GitHub.

Test program for Qt 5.15

The recommended way to port an application from Qt5 to Qt6 is to upgrade to/compile for the latest Qt5 version (Qt 5.15) first, and resolve any issues. After that, one can upgrade to Qt6.

I started with disabling any Qt modules that was deprecated between Qt 5.15 by adding the following line to the pro file:

DEFINES += QT_DISABLE_DEPRECATED_BEFORE=0x050F00

After some minor fixes, I got the program to run and almost all tests to pass.

Upgrade Qt 5.12 to Qt 6.3.2

I used the online installer and I found some strange issues when trying to run the program. 
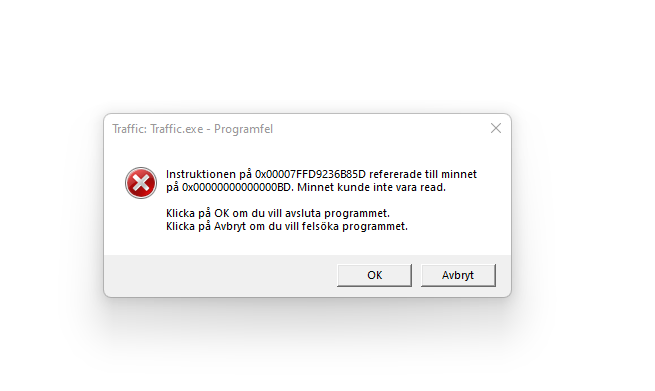


The issue was that the module QtLocation (a module that is enabling maps on Qt applications) hasn't yet been ported to Qt 6. The work is ongoing and can be tracked here.


This means that I need to postpone the migration to Qt 6 and use Qt 5.15 instead.

Using Qt 5.15 - a new crash

After installing Qt 5.15, I got a software crash when running the application. 

The program worked fine in Qt 5.12 so I assume there are changes in Qt between 5.12 and 5.15 that made my code fail.

My classes trainListModel, stationListModel and trackListModel are Model/View implementations for the network and are used to simplify the data presentation. They all inherit the trafficDataModel, which in turn inherits the QAbstractTableModel, which inherits QAbstractItemModel, which inherits QObject.


There is a flaw when I call the insertRows() function, where the position where I want to add rows is calculated as a number that I just incremented. When changing the position to the actual list of the train/track/stationListModel, the program works fine. 

The next step will be to review the code and push it to GitHub. After that, I'll investigate what to implement next.

Saturday, 18 June 2022

Hiding Information in Repos

When adding my codebase to Github, I want to avoid telling the world about my login credentials. To do this, I'll save the information in separate files that will be imported during runtime. I won't push those files to my Github repos and my credentials will remain secret.

I'll focus on Python and Bash in this blog post.

Bash scripts:

Create a file, for example "secrets.cfg" with the content:

password=testa123
In the bash script, source the file. Now, the parameters will be available as $password:
$ source settings.cfg

$ echo $password

testa123

Python scripts:

I'll use dotenv to set environment variables from a .env file that is ignored by Git.

I'll create a file ".env" with the content

DOMAIN=fatsug.example.org

The python script will use dotenv, so you need to install it using pip.

pip install python-dotenv

I'll make the python script look for a .env file in the users home folder. This is how the python script looks like:

import os
from os.path import expanduser
from dotenv import load_dotenv

load_dotenv(expanduser("~")+'\.env')
print(os.getenv('DOMAIN'))
For convenience, I can merge the secrets.cfg and .env files to one. Thus, I'll have all my user credentials at one location. 

Saturday, 21 May 2022

New Repos to GitHub

 After some months of inactivity, I've been looking into my codebase again, with some challenges: 

  • It is easy to forget where I've placed the code on my computer. Sometimes, there are different versions of the scripts at different locations. I want to have the code at one location. 
  • It is easy to forget the syntax and order of the scripts. I want to document the projects at the same location as the code itself.
  • I need to centralize the API keys, instead of having them directly in the code.

The solution is to add everything to different GitHub repositories. The repositories worth mentioning are:

cutetrains/hiddenProjects - Projects that I won't share with others at all. These projects include web scrapers and tools for price prediction for financial assets. None of these projects are illegal (this goes for all my repos). No link for obvious reasons.

cutetrains/IOTProjects - Projects for home automation, facial recognition and robotics. I'll use this repo for downloading code into my Raspberry PI. Some of the projects communicate with Arduino boards. For the Arduino part, I'll have the code at my Arduino.cc account.

cutetrains/trafficControl-dev - TrafficControl, a C++/QML train network simulator.

cutetrains/TravelTimeCalculator (Discontinued) - A small Android App that I wrote to get some understanding on Android App development. I'm working in the 4G/5G base station industry with experience from 2G/3G/4G mobile phone verification. I wanted to have some clue about what app development is about.

cuteTrains/StockToDatabase (Discontinued) - A web scraper that collects key numbers for stocks, converting data into a database and performs some machine learning on the data.

I will add instructions and documentation for the non-discontinued public repos.

I'll spend some time on the IOT projects in the near future. 

Saturday, 9 April 2022

IOT: First Steps for the Robot Project

One important part of my IOT project will be to have a small robot that can move around in my house and stream video/pictures with an acceptable delay.

I spotted a platform/robot car that I can start with at a Swedish electronics store and I've spent a couple of evenings with my four year old son building the basic design. In the original setup, the robot uses an ultrasound sensor to determine in what direction it will move.

The robot car consists of:

  • An Arduino board (a very limited computer)
  • A H bridge that controls the engines
  • A pair of simple analog engines that takes 5-10 volts as input.
  • An ultra sound sensor
  • A servo motor that moves the sensor in different directions.
  • A battery pack of 6 AA/LR6 batteries that gives 9 volts.

I've disconnected the original battery pack and replaced it with a power bank.
Later, I've removed the battery pack.


Connecting a Raspberry PI Computer.

The original setup feeds 9 volts both to the engines and to the Arduino board via the DC jack. However, I want to use a Raspberry PI computer with a camera module. 

With the Raspberry PI computer, I can connect to the internet over Wi-Fi, setup a video stream or a web server and do some imaging. An USB/Serial connection can handle the interface between the Arduino and the Raspberry PI.

However, it is not that straightforward to connect a Raspberry PI to the Arduino in this setup. The manufacturer recommends that the battery pack is disconnected before connecting to the USB port on the Arduino. There are two options to communicate between the Arduino and another computer:

  1. Keep the batteries and connect a cable to GPIO pins on the Arduino and Raspberry PI. Since the boards are operating on different voltages (5 V and 3.3 V respectively), I would need a level shifter in between.
  2. Remove the battery pack and connect the Arduino to the Raspberry PI. That would mean that the motors will get only 5 V. This is the easiest solution, I'll maybe explore the other solution later. Another advantage is that I'll reduce the weight of the vehicle.

I've replaced the battery pack with a LEGO rig for the Raspberry PI computer. 

In the next blog post, I'll modify the code of the Arduino so that I can send commands to it via the Raspberry PI.

Saturday, 11 September 2021

IOT: Designing the Arduino Part of the Face Recognition System

After finalizing the Stock Analyzer project, installing Solar Panels to my house and exploring Quantum Computers, I will continue with my IOT project. 

I am currently able to detect a face using OpenCV on a laptop. The next step will be to migrate that functionality to a headless Raspberry PI that is connected to an Arduino. In this blog post, I will design the Arduino board.

The person in the picture is more similar to James Dean than to Marlon Brando and Audrey Hepburn.
 Training data is very limited, with only 20 pictures of three celebrities, and that causes the identifier to perform poorly

The Arduino Panel
When a user is pressing a button on Arduino, the RPI will take pictures every x seconds. It will try to identify the faces on the last picture. If a face is identified, it will send the corresponding name back to the Arduino. The names will show on the LCD and corresponding LED's will activate. If faces are detected but not identified, an alarm will activate. 

The Piezo element and the red LED to the left are used for alarms.
The button sends a start/stop signal to the connected Raspberry PI computer.
The four LEDs to the right identifies four persons. 


There are three cases:
  • No face is detected on the last picture
  • At least one familiar faces - disable the alarm, if active.
  • No familiar faces - start an alarm.


Saturday, 21 August 2021

Using a Quantum Computer to Roll a Dice

There has been some buzz about Quantum Computers (QC) over the last years. The QC's that are in use today are very limited but the capacity is growing rapidly. QC advocates hope to see computers that can solve problems much faster than classical computers can do. Other fear that some of the current cryptography systems may be broken with Quantum algorithms, such as Shoor's algorithm.

In this post, I will show how easy it is for a random blogger to create a simple Quantum algorithm and run on a Quantum computer.

Really Cool.
Coolness level: 15 mK ( -273.13 degrees Celsius)


Why a Dice?

There are tons of electronical dices out there. But they are made for classical computers and classical computers are built to be predictable. So if you know the random seed and the algorithm for the random generator, it is possible to predict the outcome of a dice. 

For a physical dice, it is also possible (in theory) to predict the outcome, given the rotation, position and thetranslational movement of the dice, combined with the surface and athmospheric conditions of the environment. 

For Quantum Computers, the outcome is by it's very nature random. The randomness comes from a superpositon of two equal states that collapses into one state.

Step 0: Foundations

I strongly recommend taking a university level course in quantum mechanics to get familiar with the basic concepts. 

I enjoyed reading Jack Hidary's book Quantum Computing: An Applied Approach


Anastasia Marchenkova has an interesting Youtube channel where she covers up-to date material about Quantum Computing.

If you're really short on time, you can see Wired's five levels of difficulty introduction to Quantum Computing


Step 1: Accessing IBM Quantum (Web)

The second step is to create an account on IBM Quantum. IBM Quantum allows the general public to upload programs to QC's and run for free.

Once I've got an account, I can create programs to run, either on a simulated or physical Quantum computer. There is an online Development Editor that is useful for learning. 


Step 2: Create and Run a Simple Program:
It is quite easy to add elements to the program - click and drag elements to the proper places.


In the program above, I use two Qubits. One is set to a superposition of |0> and |1>. The other Qubit is entangled with the first Qubit. Finally, both Qubits are measured, one by one.

To run the program on a QC, I select "Setup and Run", where I can select the QC or simulator to use
After the completion, I explore the result:

Theory says that both Qubits shall have the same value. This happens most of the times, but sometimes the Quantum Computer fails. This means that there should be some caution when looking into the results of these kinds of QC's.


Step 3: Creating the Dice from Python

I prefer to write the program in Python and it is easy to do it using the API key

The Python program is using qiskit (one of the more popular syntaxes for Quantum Computing).


The program sets up three Qubits that are set into a superposition of |0> and |1> (50% likelihood each). It is measuring the three qbits individually and the result is saved to a binary bitmask of size 3 ("000" -> "111"). To map the bitmask to a six sided dice, I repeat the circuit until I get "001"/1 up to "110"/6. This is the output from the dice.
The red text is a hardcoded warning that I 
wasn't able to supress. 
The dice repeated once, but the final value was 1.

That's it. There are no excuses. YOU can program a quantum computer and YOU can run the program on a physical quantum computer.

Saturday, 31 July 2021

Silence Doesn't Mean Inaction

My blog has been silent for a couple of months. This often happens when I focus on other projects - and I think it should be that way. 

Children: Spending time with a baby and a pre-school infant is sometimes challenging, always rewarding.

Work: In my new position (same company), I have more challenging and interesting tasks than before. I create reports, make changes in the test framework and work closer to the hardware. As I've had a steep learning curve at work, I've had a much slower pace for my pet projects.

Home: We have had a major renovation project in our house, including:

  • A new roof
  • Solar panels on the new roof (not yet connected to the power grid). More details on my other blog.
  • Wood floor for the attic
  • Replacing the side panels
  • Installing a skylight window
  • Installing a wood stove

The project took two months of time and I didn't have time to focus on pet projects. 

As I've entered a long parental leave and we have no (major) projects in the house in a near future, I hope to have more time for pet projects.