Saturday 20 March 2021

RPI: Upload a File to Cloud in Raspberry Pi CLI

I want to upload a photo to Google Drive or Dropbox using a Python script in a Raspberry PI.

A home surveillance use case might be:
  • A sensor detects that someone has entered the room (not implemented yet!)
  • A camera takes a photo of the living room
  • The picture is uploaded to the cloud before the burglar destroys the Raspberry PI.
Trying Google Drive
I enabled the Google Drive OAUTH using the public documentation and a guide from Iperius Backup. When running the python script, I got a error message that told me that I need to verify the app/script towards Google and that process seemed to be complicated, so I decided to try another approach.

Testing Dropbox

After giving up Google Drive, I found the Dropbox approach to be much more successful. It takes two steps to activate: Create a local script that connects to Dropbox, and define what the script is allowed to do. 

First, I define what the script is allowed to do:
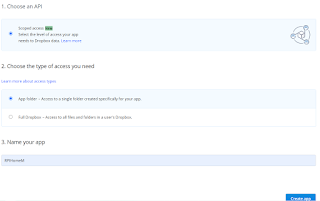
Step 1: Configure the new app access credentials in Dropbox
  1. Log in to Dropbox Developers and go to the App Console and select Create App.
  2. There are three steps to take:
    1. Choose an API - Dropbox allows only scoped access (the creator of the app can select what authorities the app can have).
    2. Choose the Type of Access  You Need - I choose App Folder for security reasons. The Full Dropbox option would allow the app to access all files in my account and that would be risky.
    3. Name your app - this name must be unique in Dropbox. You can't use a name that any other Dropbox developer has used.
Step 2: Now when the app is created, I need to define the scope (privileges) of the app. This is done in Scoped App
Step 3: Select what the app shall be allowed to read and modify in my Dropbox account:
Step 4: Once that is configured, it is time to generate an access token. The default Access token expiration  is Short-lived (expires in four hours). I select No expiration. I click Generate and I copy the code that is shown.
The access token must be re-generated if any access token is changed.
The second part is to write the Python code. 
The script uploads the specified picture with the current time as file name.

That's it! When I run the script, the file is uploaded to my Dropbox account

Of course, I could have set up Dropbox the normal way (assigning a folder and sync it to Dropbox). In this case, I didn't want to save 2G of files on a SD card with limited disk space.

I found a video tutorial that illustrates how to do it:

In my project anatomy, there are only two steps left, before starting the next sprint of my IOT project. 


Saturday 13 March 2021

IOT: Data from computer to Arduino

One of the tasks on my first IOT  project anatomy is to send data to the Arduino from Raspberry PI to my Arduino board. 

There is one Arduino feature one needs to consider when sending serial data to Arduino over USB port: Every the serial connection is established, the Arduino is reset. This is a feature that simplifies the process of loading software to the board. 

If a script establishes a serial connection to the Arduino, it takes one second for the board to boot. If the script sends serial data during that time, that data is lost. Further, if the connection is released and reestablished, the board reboots.

My solution to that issue is to wait for the board to boot and to keep the connection alive during the entire session.

The data must be encoded to binary format

The sender script specifies interface, baudrate and timeout and the receiving script sends the incoming string to the display for some seconds. 

And finally, the incoming message is shown on the Arduino LCD.

I'm getting close to completion of the first step of my IOT journey. The remaining tasks are to make the Raspberry Pi available from the external internet, send SMS from the router and to push pictures to the cloud from the Raspberry Pi whenever someone activates the emergency button.

After that, I'll plan the next steps for the IOT project.


Saturday 6 March 2021

IOT: Connecting Raspberry Pi to Thingspeak

This one was easier than I thought. I wanted to send/log data from my Raspberry Pi to Thingspeak. 

Step 1 - Activate a Thingspeak Account and set up a channel

The channel has a number of fields. In this case, I use only one field, "field1".

Step 2 - Get an API key for Thingspeak

The API Write key is necessary for Thingspeak to know what channel to publish to. 


Step 3 - Send data to Thingspeak using "POST" with the channel number and the data.
The free version of Thingspeak allows for one update every 15 seconds. My script simply takes a number from the console and posts it to Thingspeak with a 15 second interval.


The result: