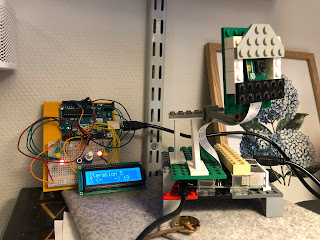
In this step, I'll send data from Arduino to Raspberry PI.
When the user activates the emergency function, a signal will be sent to the RPI that will take a photo and publish on a web server. You can find more information about the traffic lights project here.
Step 1: Connecting Arduino to Raspberry PI
 |
| The RPI is connected to a camera module. A USB cable connects power and serial from the RPI to the Arduino. |
The first step is to find the serial port. For the RPI, I've compared the tty ports without and with the Arduino.
 |
| The interface /dev/ttyACM0 shows up when I connect the Arduino over USB. |
I uploaded a small python script with code that I found on DiyIOt from my Windows computer to my Raspberry PI.
 |
| I added a couple of lines to take a photo on the webcam |
Step 2: Take a picture, if the emergency button is pressed.
The script checks if the message matches the expected string. If it does, the script will ask the shell to take a photo and save it in /var/www/html/ folder. |
| When the RPI detects "Switch to Emergency", it captures a JPEG image. |
Step 3: Publish the image on the web server
The /var/www/html folder is owned by root. This makes it hard to save files there automatically. To resolve this, I've changed the ownership and permissions for that folder.
A very simple web page that reloads every third second shows the picture. Code and screenshot below:
The updated webpage looks like this:
Now, an event on the Arduino can trigger the RPI to take a photo and show it on an internal web page. The next step will be to send some feedback from RPI to Arduino and to explore video streaming from RPI.


No comments:
Post a Comment